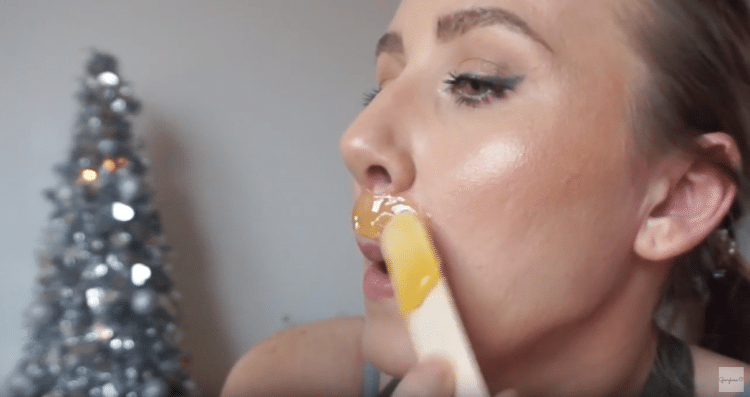
I hate hair growing on my face. Why do I even have it? What purpose does it serve except to embarrass me and make me feel ugly? I want it gone, and fast. But what is the best method of facial hair removal for women?
You may be unsure about removing hair from your face. After all, if it were to go wrong everyone could see the results as soon as they looked at you. This makes many women cautious about hair removal.
However, I have been removing the peach fuzz from my face for many years without any problems – except for some slight redness which lasts 30 mins or so. So if you are worried about it, don’t be. Removing hair is tried and tested.
However, there are many methods you could use to remove facial hair such as laser removal, creams, waxing, and even shaving.
But which is the best?
Table of Contents
My recommendation: waxing
I recommend waxing as the best method for women to remove facial hair. It is quick, inexpensive and works well. It also removes the hair at the root so when new hair grows it is finer and less obvious. This is the technique I have been successfully using for many years.
I found the creams caused skin irritation and other side effects plus they didn’t work very well. They removed some hair, but some was left behind giving a patchy appearance that you could see under some lightening conditions. This looked unsightly to me and was less effective than waxing which removed everything.
Laser treatment is another option which claims to be a permanent solution but it too has its dangers, many of which are not fully understood. I found it too expensive to try but if you have an unlimited budget it may be worth considering.
The worst thing you can do as a woman is to shave the hair on your face. This encourages the hair to grow faster and when it comes through it get thicker. This means you may end up with stubble to rival your husband – which is not a good look!
So now you know what you should be doing, let me explain the tools and techniques you need to remove hair from your face quickly and reliably.
Tools you need for waxing
- A method of heating the wax such as a wax warming machine or a microwave oven
- A wax that is suitable for your face
- Coconut oil
- Wooden spatulas
- A moisturizer
- Cotton pads
- Very cold water
- Some paper towels for cleaning up
To make the waxing process quick and easy I bought a cheap wax warming machine from amazon for around $20. This machine keeps the wax at exactly the right temperature for the waxing process. This really helped speed things up.

I have also tried warming wax in a microwave oven and, although it works, it cools very quickly so you have to reheat it regularly. This means it takes far longer to wax as you are going back and forth to the kitchen to heat it up. I also found the microwave often overheated the wax so I had to wait for it to cool down meaning I spent more time waiting than waxing.
I use GiGi Brazilian Body Hard Wax for waxing my face. It is a non-strip formula designed for sensitive and delicate areas. It is important to select a wax that is suitable for your face as the kind that is used on your legs has a completely different texture and therefore isn’t suitable for use on your face.

The GiGi Brazilian Body Hard Wax I use comes in a metal tin which has one major advantage – the whole tin can be placed directly into the waxing machine. This means you don’t have to pour in the wax into the machine making a mess and wasting a lot of it. Instead, it simply stays in the supplied tin which you heat. So this is another timesaver as I can simply pop the lid on after the wax has cooled without any cleanup. I also don’t need to clean the machine either as none of the wax gets stuck to it.
If GiGi supplied the product in a plastic container I couldn’t do this as it would probably melt and contaminating the wax.
The only downside with GiGi Brazilian Body Hard Wax container is that it is not suitable for the microwave. So if you don’t have a waxing machine you might one to track down a different facial wax in a non-metallic container.
The waxing process
When and how to wax
I always recommend you wax in the evening to give your upper lip a chance to calm down overnight. You can do it at other times and cover the redness with makeup but I don’t think this is as healthy for your skin.
I wax my mustache in 3 sections. The left, the right, then last of all the middle. Doing smaller sections makes applying the wax easier and also ensures you can remove the hair in the most pain-free way possible.
Preparation
The first thing I do is get all the tools I need out and ready to use. I plug in the wax warming machine and pop the GiGi wax inside. I put the machine to the highest temperature possible so the wax melts quickly.
Once the wax has melted I then switch the temperature of the machine down so it is kept at a constant temperature and is ready to use.
While the wax melts I remove my makeup and I cleanse my face. I then apply a little coconut oil on my upper lip. The coconut oil makes it easier to peel the wax and minimizes redness.
By the time I am ready to begin the wax is normally melted. It is important to get the right consistency. If it is too runny the wax tends to run when you apply it so you end up with it all over your face instead of on your upper lip. If it is too thick then you can’t spread it easily.
I always suggest a viscosity that is slightly thicker than squeezable runny honey.

Waxing technique and tips
I use the wooden spatula to pick up the wax. I find that if I rotate the spatula as I lift it out it loops any of the loose drips onto the back. This is quicker than waiting for it to drip off. You also have to remember that as soon as you scoop up the wax it begins to cool so you want to get it on your face as quickly as possible.
I apply a fairly thick layer over the upper lip. I also make sure that I put the wax on in such a way that I have a section I can easily grab with my forefinger and thumb so I can pull it off.
I suggest applying the wax beyond your upper lip to an area with no hair, for example towards your cheek. This allows you to get your finger under the wax without pulling at any hairs. This makes it far less painful to grab and peel the cooled wax off.
If you apply the wax too thin or don’t leave a finger hold you can grab then it makes it difficult to remove. Thin wax tends to come off in small bits rather than a single piece. This makes it more painful to remove and doesn’t pull the hair out properly leaving you with some bits missed.
If you think you have applied too little wax you can always add more to make it thicker.
Once applied, wait for the wax to cool for approximately 2 minutes. Don’t let it cool too much or it will become brittle and won’t come off easily – it will just break.
Get your finger under the wax beside you cheek so you can grab it with your finger and thumb. Try to stretch your skin with your other hand as it helps the wax come off in one tug.

If you look at the wax once removed you should see the peachy fuzz hair attached. You may also notice your skin is quite red, but this normal and it will calm down in a few minutes.
Calm your red skin
Once I have waxed the left, right and center sections of my upper lip I then wash it with cold water to close the pores and calm the skin. To do this I normally wet a cotton pad and dab it on the area gently rather than roughly wash my face. You need to be kind to your skin after the trauma it just suffered!
I then moisturize my upper lip with Liz Earle Cleanse and Polish. I find it really calms my skin and gets rid of the redness fast.
Normally the redness calms down within 20-30 mins so if you do plan to try this at home during the day you should be back to normal and hair-free in time for the evening.
Did you enjoy this article?
If you found this article useful please take a moment to tweet, like, or share this article by using the buttons at the bottom. I’d really appreciate it.
Also, if you are feeling extra generous please leave some encouraging feedback in the comments section at the bottom of the page. I love getting feedback from visitors. It will encourage me to write more natural treatments that are cheap and effective!
Thanks for taking the time to read my website and I hope to see you here again soon!